The basics in solving a Rubik's cube
Learn the basic algorithms of Rubik's cube to get out from a sticky situation
Algorithms are the most important part in solving a Rubik's cube.It helps you to remember and solve a Rubik's cube just like finding a way to get out of a sticky situation.THE BASIC MOVEMENT NOTATION AND ALGORITHMS
Understanding the movement notations are essential to fully understand the algorithms of a Rubik's cube. Every notation designates one of the cube layers that should be turned clockwise 90 degrees or counter clockwise. The basic notation for the cube is Up, Down, Right, Left, Face, and Back (U, D, R, L, F, B). It refer to the different layers of the Rubik's cube.Also,remember that the notations are all relative and are determined by basing on the cube's orientation. Face, for instance, refers to the layer that faces you when you hold the cube. Note:When a notation has an apostrophe (e.g.R'), it means that you should move that layer counter-clockwise 90 degrees.
Steps in solving a Rubik's cube
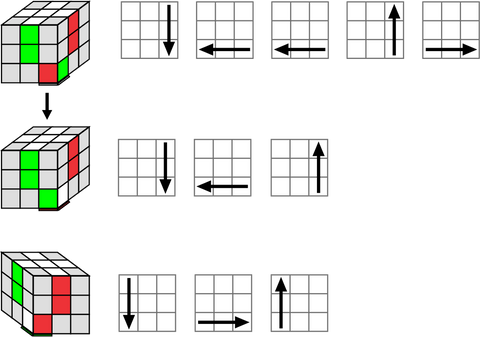
STEP 1 - COMPLETE THE FIRST LAYER CROSS
- Keep WHITE centre on top
- Put the GREEN centre piece in front (facing you)
- Find the GREEN/ WHITE edge piece (it only has 2 colours) and turn it to one of the positions shown below (keeping white on top and green in front)
- Choose the options below that matches your situation and follow the arrow steps to place the GREEN/ WHITE edge piece in place

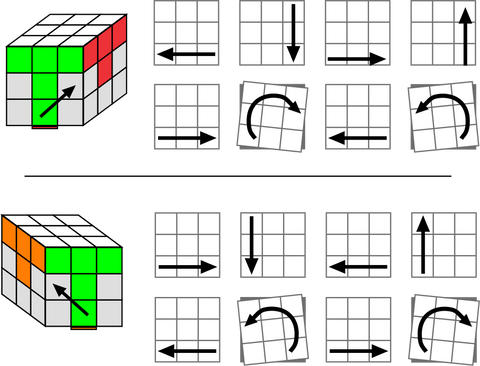
STEP 2 - COMPLETE THE FIRST LAYER CORNERS
- Keep WHITE on top
- Put the GREEN centre piece in front (facing you)
- Find the GREEN/WHITE/RED corner (it has 3 colours) and place it in one of the positions below (without disturbing the white cross)
- Choose from the steps below to place the GREEN/WHITE/RED corner piece in place without disturbing the white cross.
Possible Problem:
The corner you are looking for is in the top layer, but in the wrong position or turned the wrong way around. Turn the cube so that the corner is in the front right top corner then move the corner to the bottom layer by following the following steps.
The corner you are looking for is in the top layer, but in the wrong position or turned the wrong way around. Turn the cube so that the corner is in the front right top corner then move the corner to the bottom layer by following the following steps.
Solution:

Perform these steps , then choose from steps (A), (B) or (C) above to put the corner in place
- Keep WHITE on top
- Find the GREEN/RED edge piece
- If it is in the bottom layer, then turn the bottom layer to match the edge with the centre colour (see fig below).
- If the edge is not in the bottom layer, then go to Step C
- Choose from the steps below to place the edge piece in place.
Possible Problem:
The edge piece you want to move is in the second layer, but in the wrong position or the wrong way around.
The edge piece you want to move is in the second layer, but in the wrong position or the wrong way around.
Solution: Turn the cube so that the edge is in the front layer then do either solution above to move the piece into the bottom row. The go back to step 4 above.

Continue A and B with different centers facing you until the second layer is complete
Continue A and B with different centers facing you until the second layer is complete
STEP 4 - COMPLETE THE THIRD LAYER CROSS
- Turn the cube over (white is now on the bottom and yellow on top)
- You should find that there is 0, 2 or 4 pieces (of the cross) facing upward. Ignore the corners for now.
- The idea is firstly to get the yellow cross and secondly to turn swap pieces to the correct position in the cross.
- Perform the algorithm below to get to the yellow cross. Make sure your cube is orientated is shown in the image.

Repeat this algorithm till you get the yellow cross
You will now have 4 or 2 edge pieces in the correct place. Matching with the center colors. Ensure the correct edge pieces are at the back and right face. Use the algorithm below to put the edge pieces in the correct position.

Possible Problem:
Two pieces in the correct position are opposite each other.
Two pieces in the correct position are opposite each other.
Solution: Perform the steps in (A) once and then turn the cube like the one shown that's above and perform the steps again.
STEP 5 - COMPLETE THE THIRD LAYER CORNERS
(1) First we will put the corners in the correct position (A).
You will now have either 0, 1 or ALL the corners pieces will be in their correct positions, either the right way up or reversed.
If one corner piece is in the correct corner turn the cube to that this correct corner is in the front top right position. The piece is in the correct position, but may not be turned the correct way around.
(A)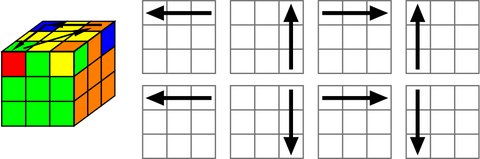
Repeat the sequence until all the corners are in the correct position.
Possible Problem: None of the corners is in the correct position.
Solution: Perform the steps in (A) once with any side facing you (YELLOW at the top). If one corner will be in the correct position then proceed with (A) above.
The next steps will turn the corners (one by one) the correct way and ultimately solve the cube.
Solution: Perform the steps in (A) once with any side facing you (YELLOW at the top). If one corner will be in the correct position then proceed with (A) above.
The next steps will turn the corners (one by one) the correct way and ultimately solve the cube.

Very helpful
ReplyDeleteI think with this blog I can now learn how to solve a rubiks cube
ReplyDelete*o*
ReplyDeleteWOW
ReplyDeletecool!!
ReplyDeleteVery interesting
ReplyDeleteWow....very cool
ReplyDeleteThis comment has been removed by the author.
ReplyDeleteWOW! RUBICS CUBE!
ReplyDeleteVery educational
ReplyDeleteI love this game!
ReplyDeleteSWEEEETTTT
ReplyDeleteLearning the cube is indeed so much fun
ReplyDeleteHad so much fun reading!
ReplyDeleteThis blog is very informative
ReplyDeleteInteresting !
ReplyDeleteOmg thank u, saved my life urghh
ReplyDeleteWow! Cool post thanks for sharing:)
ReplyDeleteomg! nice!
ReplyDeleteWow! nice blog!
ReplyDeleteVery helpful!
ReplyDeleteAmazing instruction...so educational
ReplyDeleteVery detailed and also nice instrictions
ReplyDeleteVery accurate in teaching
ReplyDeleteVery detailed
ReplyDeleteIt's very informative
ReplyDeleteAyooosss
ReplyDeleteVery informativeee
ReplyDeletethanks for the basis
ReplyDeleteWowowow! Great Blog!
ReplyDeleteNice instructions
ReplyDeleteAmazing...cool
ReplyDeleteCool
ReplyDeleteVery great blog
ReplyDeleteVery helpful ï
ReplyDeleteGood blog
ReplyDeleteLearned a lot of stuff
ReplyDeleteThanks for the help
ReplyDeleteGreat content
ReplyDeleteVery nice blog!!
ReplyDeleteThank you for the tips!
ReplyDeleteVery nice blog!
ReplyDeleteI love it!
ReplyDeleteSo nice! Thank you for the infos.
ReplyDelete*o*
ReplyDeleteI like it!
ReplyDeleteGreat Structure! Good post! Your Post is Very informative White Alpaca offers you very affordable rubicks cubes in Sydney. All our products are best fit to a specific age group of children. Don’t look here and there. Get amazing Rubiks cube rubicks cubes sydney
ReplyDeleterubicks cubes sydney